
Collaboration
Presentation Mode

Presentation Mode is ideal for remote teams and supports smooth, efficient team meetings. Changes are visible to all users in real time, while bandwidth usage remains lower compared to other tools.
How does Presentation Mode work?
When someone starts a presentation, all other users receive an invitation to join. Once Presentation Mode is activated, the pointer appears, showing the initials or avatar image of the current presenter.
A red status dot next to the avatar in the Filter Bar identifies the presenter, a blue dot shows all users who are following the presenter, and a green dot marks active users who have not yet joined Presentation Mode. You can also tell that you are the presenter by the red border around the board.
By moving the Presenter Pointer, you can control the screen of all users who have activated Presentation Mode and guide them through the board. The movement of the cursor and any sticky notes moved by the presenter is shown to all users. When the presenter opens the Description Editor, it is visible to all participants in read-only mode. When the presenter edits the text in a sticky note, this is visible to all other users in real time through Live Transmission.
In the Presentation Toolbar, you can see how many board members are currently following you. Participants can see the identity of the current presenter and take over the presenter role by clicking “Take over.” If a user moves away from the current view, they are given the option to rejoin the presentation, but can continue making changes independently in the meantime.
For better visibility, stickies selected by the presenter are highlighted with a golden shadow.
It is recommended to connect in parallel via phone, Skype, or Microsoft Teams. While explaining, you can use Presentation Mode to zoom into the relevant part of the ALEAS board, change the status of your stickies, add new tasks, and more — all in real time and visible to all connected users.
Collaboration
Scrum Clock
The Scrum Clock is part of Presentation Mode. Whenever a user activates Presentation Mode, the Scrum Clock appears below the Filter Bar. It was specifically designed for Scrum meetings to help keep track of each participant’s speaking time. Please note that every user can change the set time at any time, not only the active presenter.
The Scrum Clock continues counting until someone clicks the Pause button. It then switches to a negative counter, showing by how many minutes the planned time has been exceeded.
Collaboration
Lens
The Lens is also part of Presentation Mode. After activating Presentation Mode, when you click on a sticky, the presenter automatically jumps to the new position. At the same time, the sticky is enlarged in the Lens and is visible to all board members in Presentation Mode. This allows every user to follow easily without having to zoom in or out.
You can find more information about the Lens & Sidebar in the “IntelliSticky” section.
Collaboration
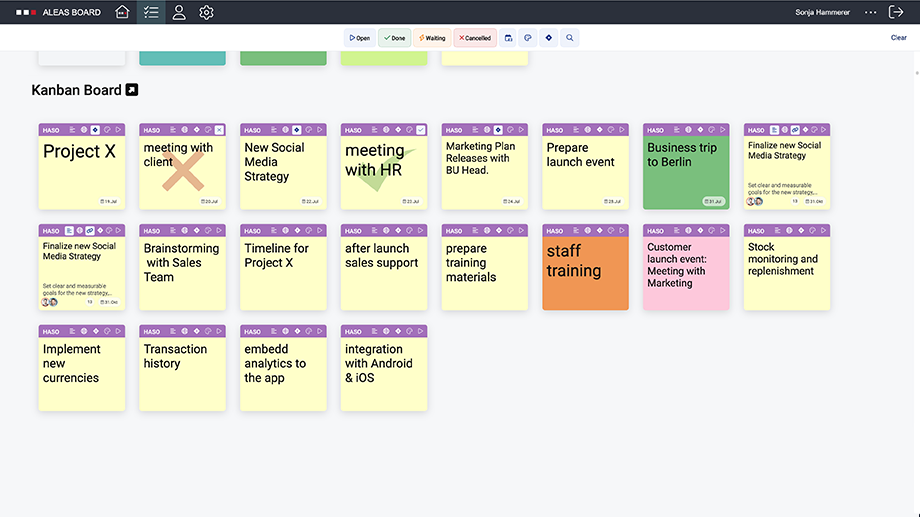
Filter Bar
The Filter Bar displays all board members. When you click on an avatar, all IntelliStickies are filtered where the user is either the Sticky Owner or an Assignee.
Stickies can also be filtered by status: Open, Waiting for, Cancelled, or Done.
It is also possible to filter by all IntelliStickies linked to Jira or by due date.
You can also filter IntelliStickies by color. This is especially useful if you have defined different color categories for your tasks or manage multiple projects on one board.
Tip: Multiple filters can be applied at the same time!
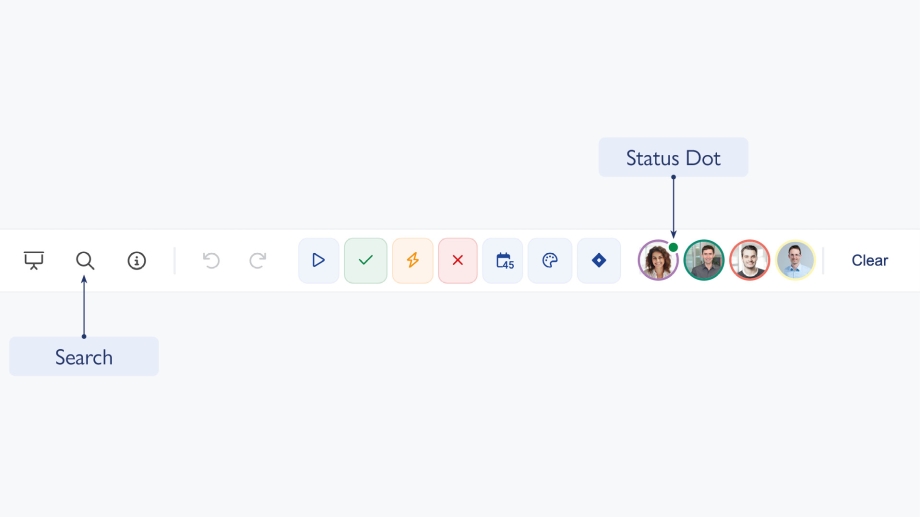
Status Dot
The status dot next to the user avatar changes color depending on the user’s status:
Green = user is online
Red = presenter (only in Presentation Mode)
Blue = viewer (only in Presentation Mode)
Full-Text Search
On the far right of the Filter Bar, you’ll find the button for full-text search. Use the search function to find all IntelliStickies on the board that contain your keyword.
Collaboration
Info Bar
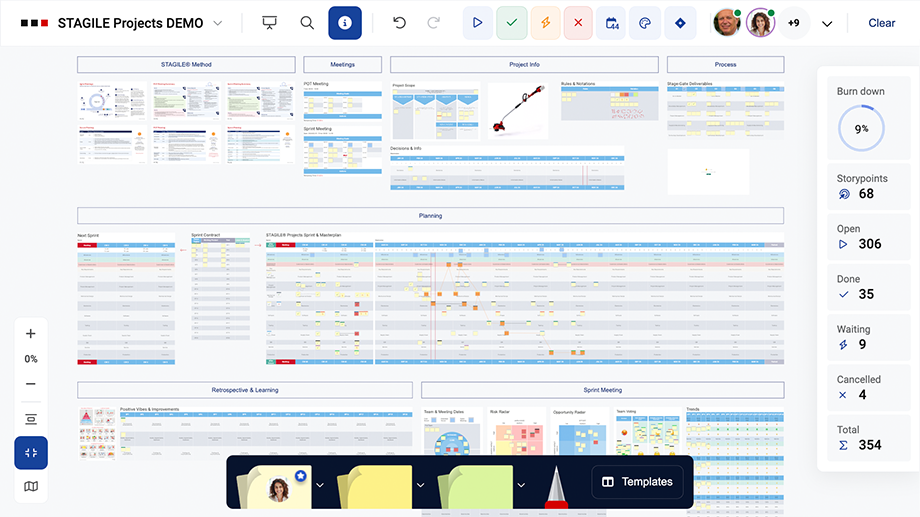
The Info Bar, which opens when you click the Info button in the upper-left corner, gives you an overview of all IntelliStickies on the board. Depending on the active filters or manually selected IntelliStickies, the information updates in real time.
You can multi-select stickies by activating the corresponding button in the toolbar or by holding Shift and selecting multiple stickies. This feature is ideal for quickly seeing how many stickies are assigned to a user, how many tasks are still open, and more.
At the top of the Info Bar, you’ll find the Burn Down Ratio. It calculates the percentage of “completed” IntelliStickies — stickies with the status “Done” — in relation to the total number of stickies. This is a useful indicator for tracking your project’s progress.
Collaboration
Pen Tool
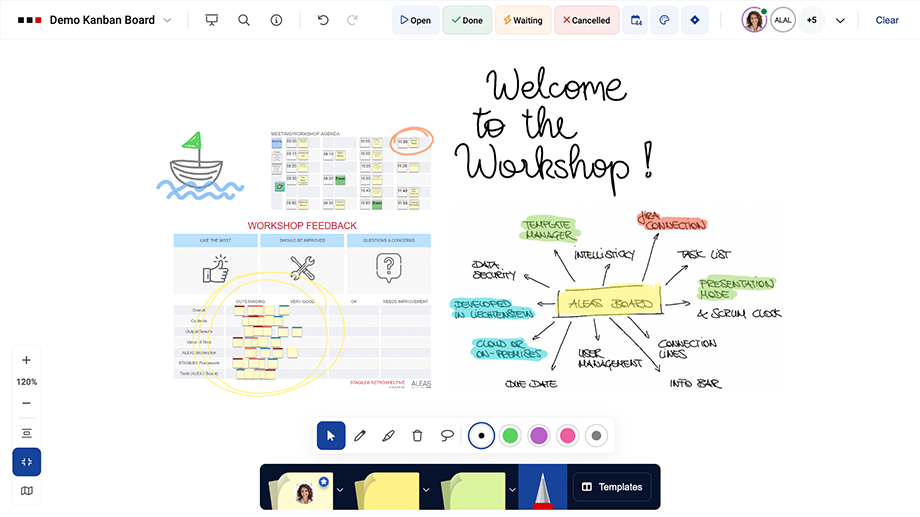
With the Pen Tool, you can add handwritten notes and freehand drawings to the board, make annotations, and highlight important elements — especially useful when working with ALEAS Board in a meeting or workshop.
The Pen Tool can be used with a mouse or any stylus, such as an Apple Pencil or Surface Pen, on a tablet or touchscreen. You can switch between pen and marker with just one click.
- Drawn elements can be moved, scaled, or deleted like a template.
- You can switch between different colors and stroke widths in just a few clicks.
- The Lasso Tool is very useful for selecting hand-drawn elements on the board by marking a custom area.
- Your recently used pens and markers in the “pencil case” are saved across all boards.
Collaboration
PDF Export
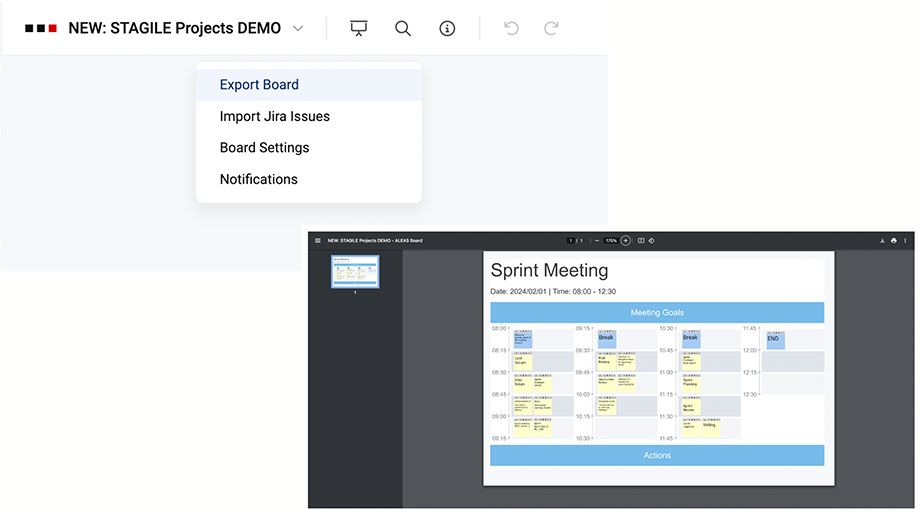
In addition to the Sticky Excel Export and the Backup function, boards can also be exported as PDF files — a quick way to save a local copy, document the current status of the board, or share boards with external team members.
You can find the “Export Board as PDF” function in the Toolbar on the left side. Simply select the area you want to export and save the selected section as a PDF file.
Collaboration
Task List
The Task List — your personal overview of all stickies — gives you a complete overview of every sticky where you are the Owner or Assignee. Stickies are grouped by board, and the Task List is synchronized in real time.
All stickies remain fully functional, meaning you can edit text, descriptions, dates, or links, export them to Jira, and more. The Filter Bar is also available with all standard filter and search functions.
In your Task List, you can see all boards for which you have at least read access. If you have assigned due dates to your stickies, they are automatically sorted by date within each board.
By clicking the arrow button next to a board title, you can jump directly to that board. Right-clicking a sticky allows you to open it directly in the linked board using “Go to Sticky on Board.”
Collaboration
Bird View
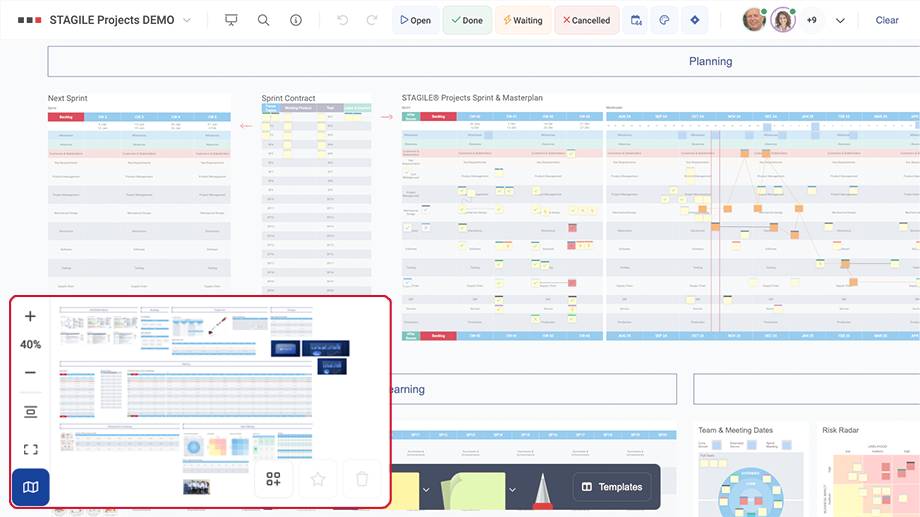
With the Bird View function, you can quickly navigate across the board. Simply click the template preview in the mini map in the lower-left corner to jump to the respective board section. With the Resize button, or default zoom, you can jump to a full-board view.
The Board Admin can save “Frames” — board sections — which is especially useful for Scrum meetings. Navigate to the board section you want to save and click the “Create Frame” button. The frame is highlighted with a red border. All board members can then use the frames by double-clicking a frame to jump to that section and navigate the board more quickly.
Important frames can be marked as “Favorites” by the Board Admin using the star button. These are then marked with a yellow star. When the board is opened, this section is displayed automatically.
If you hold down the left mouse button, you can draw a selection box in Bird View to navigate to that area with the corresponding zoom level.
Collaboration
Presentation Mode
Presentation Mode is ideal for remote teams and supports smooth, efficient team meetings. Changes are visible to all users in real time, while bandwidth usage remains lower compared to other tools.
How does Presentation Mode work?
When someone starts a presentation, all other users receive an invitation to join. Once Presentation Mode is activated, the pointer appears, showing the initials or avatar image of the current presenter.
A red status dot next to the avatar in the Filter Bar identifies the presenter, a blue dot shows all users who are following the presenter, and a green dot marks active users who have not yet joined Presentation Mode. You can also tell that you are the presenter by the red border around the board.
By moving the Presenter Pointer, you can control the screen of all users who have activated Presentation Mode and guide them through the board. The movement of the cursor and any sticky notes moved by the presenter is shown to all users. When the presenter opens the Description Editor, it is visible to all participants in read-only mode. When the presenter edits the text in a sticky note, this is visible to all other users in real time through Live Transmission.
In the Presentation Toolbar, you can see how many board members are currently following you. Participants can see the identity of the current presenter and take over the presenter role by clicking “Take over.” If a user moves away from the current view, they are given the option to rejoin the presentation, but can continue making changes independently in the meantime.
For better visibility, stickies selected by the presenter are highlighted with a golden shadow.
It is recommended to connect in parallel via phone, Skype, or Microsoft Teams. While explaining, you can use Presentation Mode to zoom into the relevant part of the ALEAS board, change the status of your stickies, add new tasks, and more — all in real time and visible to all connected users.
Collaboration
Scrum Clock
The Scrum Clock is part of Presentation Mode. Whenever a user activates Presentation Mode, the Scrum Clock appears below the Filter Bar. It was specifically designed for Scrum meetings to help keep track of each participant’s speaking time. Please note that every user can change the set time at any time, not only the active presenter.
The Scrum Clock continues counting until someone clicks the Pause button. It then switches to a negative counter, showing by how many minutes the planned time has been exceeded.
Collaboration
Lens
The Lens is also part of Presentation Mode. After activating Presentation Mode, when you click on a sticky, the presenter automatically jumps to the new position. At the same time, the sticky is enlarged in the Lens and is visible to all board members in Presentation Mode. This allows every user to follow easily without having to zoom in or out.
You can find more information about the Lens & Sidebar in the “IntelliSticky” section.
Collaboration
Filter Bar
The Filter Bar displays all board members. When you click on an avatar, all IntelliStickies are filtered where the user is either the Sticky Owner or an Assignee.
Stickies can also be filtered by status: Open, Waiting for, Cancelled, or Done.
It is also possible to filter by all IntelliStickies linked to Jira or by due date.
You can also filter IntelliStickies by color. This is especially useful if you have defined different color categories for your tasks or manage multiple projects on one board.
Tip: Multiple filters can be applied at the same time!
Status Dot
The status dot next to the user avatar changes color depending on the user’s status:
Green = user is online
Red = presenter (only in Presentation Mode)
Blue = viewer (only in Presentation Mode)
Full-Text Search
On the far right of the Filter Bar, you’ll find the button for full-text search. Use the search function to find all IntelliStickies on the board that contain your keyword.
Collaboration
Info Bar
The Info Bar, which opens when you click the Info button in the upper-left corner, gives you an overview of all IntelliStickies on the board. Depending on the active filters or manually selected IntelliStickies, the information updates in real time.
You can multi-select stickies by activating the corresponding button in the toolbar or by holding Shift and selecting multiple stickies. This feature is ideal for quickly seeing how many stickies are assigned to a user, how many tasks are still open, and more.
At the top of the Info Bar, you’ll find the Burn Down Ratio. It calculates the percentage of “completed” IntelliStickies — stickies with the status “Done” — in relation to the total number of stickies. This is a useful indicator for tracking your project’s progress.
Collaboration
Pen Tool
With the Pen Tool, you can add handwritten notes and freehand drawings to the board, make annotations, and highlight important elements — especially useful when working with ALEAS Board in a meeting or workshop.
The Pen Tool can be used with a mouse or any stylus, such as an Apple Pencil or Surface Pen, on a tablet or touchscreen. You can switch between pen and marker with just one click.
- Drawn elements can be moved, scaled, or deleted like a template.
- You can switch between different colors and stroke widths in just a few clicks.
- The Lasso Tool is very useful for selecting hand-drawn elements on the board by marking a custom area.
- Your recently used pens and markers in the “pencil case” are saved across all boards.
Collaboration
PDF Export
In addition to the Sticky Excel Export and the Backup function, boards can also be exported as PDF files — a quick way to save a local copy, document the current status of the board, or share boards with external team members.
You can find the “Export Board as PDF” function in the Toolbar on the left side. Simply select the area you want to export and save the selected section as a PDF file.
Collaboration
Task List
The Task List — your personal overview of all stickies — gives you a complete overview of every sticky where you are the Owner or Assignee. Stickies are grouped by board, and the Task List is synchronized in real time.
All stickies remain fully functional, meaning you can edit text, descriptions, dates, or links, export them to Jira, and more. The Filter Bar is also available with all standard filter and search functions.
In your Task List, you can see all boards for which you have at least read access. If you have assigned due dates to your stickies, they are automatically sorted by date within each board.
By clicking the arrow button next to a board title, you can jump directly to that board. Right-clicking a sticky allows you to open it directly in the linked board using “Go to Sticky on Board.”
Collaboration
Bird View
With the Bird View function, you can quickly navigate across the board. Simply click the template preview in the mini map in the lower-left corner to jump to the respective board section. With the Resize button, or default zoom, you can jump to a full-board view.
The Board Admin can save “Frames” — board sections — which is especially useful for Scrum meetings. Navigate to the board section you want to save and click the “Create Frame” button. The frame is highlighted with a red border. All board members can then use the frames by double-clicking a frame to jump to that section and navigate the board more quickly.
Important frames can be marked as “Favorites” by the Board Admin using the star button. These are then marked with a yellow star. When the board is opened, this section is displayed automatically.
If you hold down the left mouse button, you can draw a selection box in Bird View to navigate to that area with the corresponding zoom level.