
IntelliFrames
IntelliFrame Library
Our IntelliFrames are special templates which – as the name suggests – are equipped with special “intelligence”. All IntelliFrames can be found in a separate IntelliFrame Library in the Template toolbar, which we will be continously growing in the future.
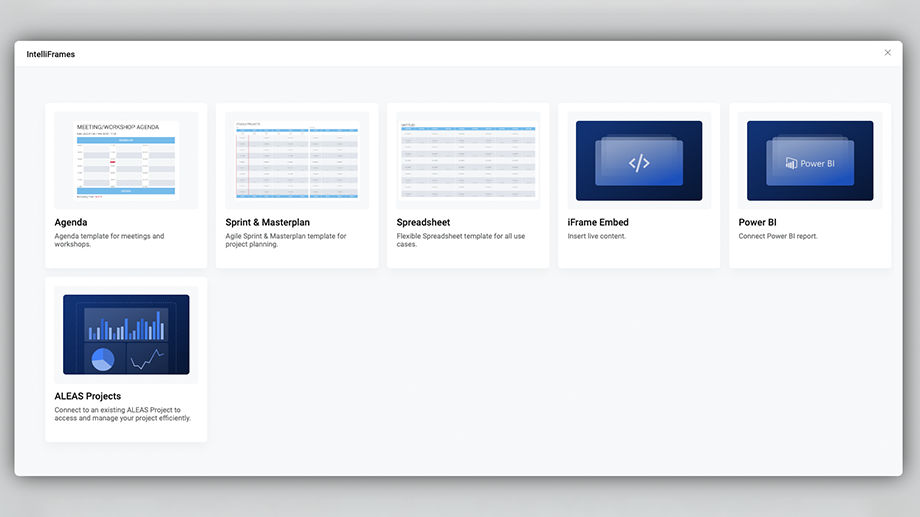
There are currently the following IntelliFrames available in the IntelliFrame library:
- Sprint & Masterplan: IntelliFrame for agile project planning
- Spreadsheet: IntelliFrame for basic tables
- Agenda: IntelliFrame for meeting and workshop agendas
- Work Radar: Display sticky notes from multiple Sprint & Masterplan in a single, time-based overview
- Jira IntelliFrame: Organize Jira issues as sticky notes in a clear grid view
- iFrame Embed: IntelliFrame for embedding spreadsheets and websites
- Power BI: IntelliFrame for embedding Power BI charts
- ALEAS Projects: Can be activated for companies that use ALEAS Projects
IntelliFrames
Spreadsheet
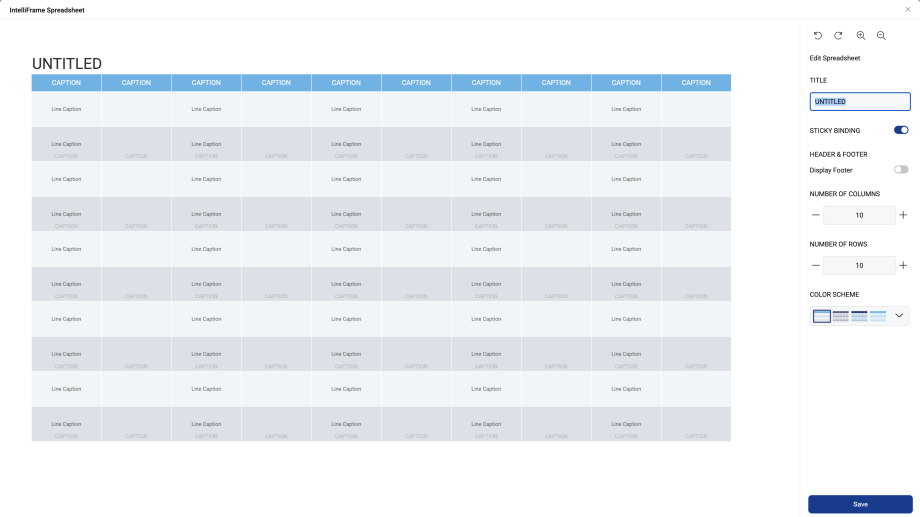
The Spreadsheet IntelliFrame is a highly versatile tool that can be used for a wide range of use cases, such as Kanban boards, budget planning, project management, or other structured overviews.
IntelliFrames
Sprint & Masterplan

The Sprint & Masterplan IntelliFrame was developed based on the STAGILE® framework and is ideal for agile or hybrid project planning. It is a calendar-based template that gives team members clear time orientation and helps them quickly identify relevant stickies for Scrum meetings.
Create a Sprint & Masterplan
When opening the editor, you’ll see the available settings on the right, just like in the Spreadsheet. One important difference is the calendar-based structure.
At the top, you’ll find the settings for the sprint section. A sprint usually lasts four to six weeks. You can set the start and end date manually or hide the sprint section completely.
Below that, you’ll find the parameters for the master plan section. While each week is displayed as a column in the sprint section, each month is shown as a unit in the master plan. By default, calendar weeks are also displayed there, but you can disable them if needed. Please note: the master plan period is a fixed time range. This means that custom columns can only be added to the left or right, but not within the existing time period.
You can flexibly adjust the timeframe in both the sprint and master plan sections, add swimlanes or custom columns, and customize the color scheme. Details on editing rows and columns can be found in the Spreadsheet section. The header color is based on the selected color scheme, while the size and color of custom columns and all rows can be defined individually.
IntelliFrames
Agenda
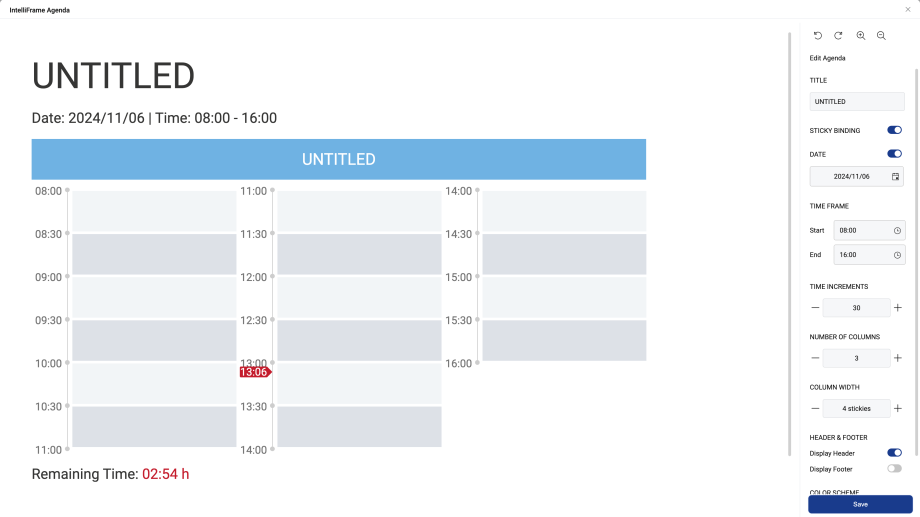
With the Agenda IntelliFrame, you can quickly create structured agendas for meetings and workshops. Compared to traditional tools, a new agenda can be created in no time and adjusted flexibly.
Create an Agenda
In the Agenda IntelliFrame Editor, you can add a title as usual and enable or disable Sticky Binding if needed. You also have access to specific agenda settings: you can optionally add a date, define a timeframe with a start and end time, set the duration of time units between 5 and 60 minutes, specify the number of columns, and adjust the column width.
When you click on the header or footer, the editing menu opens. There, you can adjust the label or change the background color.
You can also select a color scheme and show or hide the header and footer.
Once all settings are complete, click Save and place the template on the board.
Time Display
A time display is automatically shown for each agenda. The time is based on your local time zone or your time zone settings. In addition, the remaining meeting time is displayed at the bottom of the template.
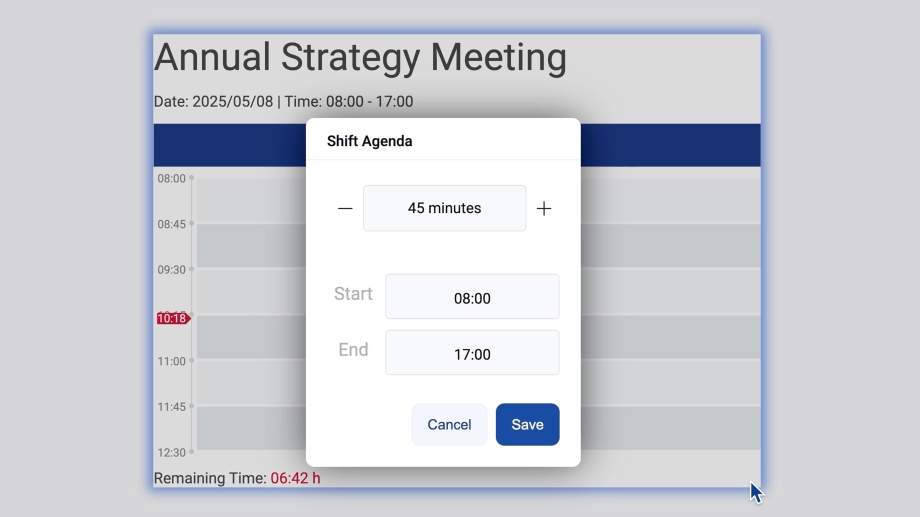
Shift Agenda
A special feature allows you to shift the time frame of your Agenda IntelliFrame with just a few clicks.
Activate the template mode and right-click on the agenda template, then select “Shift Agenda” in the context menu. A new window will open where you can change the time frame based on the current time increments. The start and end time will adapt automatically.
IntelliFrames
Work Radar
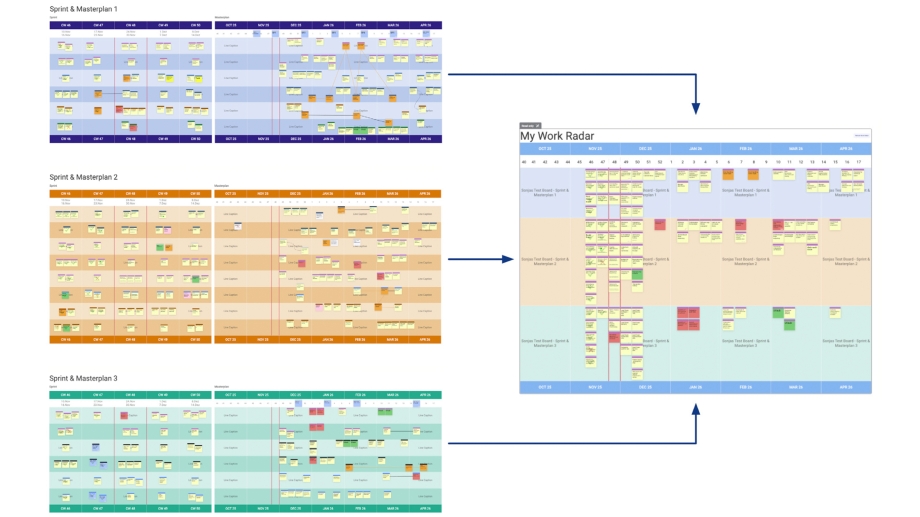
Work Radar is an IntelliFrame that brings together sticky notes from multiple Sprint & Master Plan templates in a clear, time-based view. This helps you identify overlaps faster, see priorities at a glance, and plan ahead. At the same time, you get a cross-board overview without having to switch back and forth between different boards.
Each selected Sprint & Master Plan IntelliFrame is displayed in its own row, keeping all content clearly separated and easy to understand. Stickies are automatically assigned to the correct calendar week based on their original position in the respective template. No manual adjustments in Work Radar are required.
Create a Work Radar
Open the IntelliFrame Library and select Work Radar. Enter a title, then define the time period you want to display. Next, select the boards you want to include and choose the Sprint & Master Plan IntelliFrames from those boards. You can select multiple boards and multiple IntelliFrames.
Then select one or more users. Work Radar displays all stickies where these users are assigned as Sticky Owner or Supporter.
Optionally, you can also adjust the color scheme. Once all settings are complete, click Save and place the Work Radar on your board.
Important Notes
For Work Radar to work correctly, Sticky Binding must be enabled for your Sprint & Master Plan templates.
The position of a sticky in Work Radar is based on its position in the original template. The upper-right corner of the sticky is used as the reference point for assigning it to a calendar week. If the right edge extends beyond a week boundary or separator line, the sticky will be shown in the following calendar week.
If a sticky appears in the wrong column, open the corresponding board with the Sprint & Master Plan and adjust its position there.
Working with Work Radar
Use the Refresh button to reload the Work Radar, for example after making changes to one of the linked boards. You can also edit the Work Radar at any time, for example to adjust the time period or change the selected boards.
Right-click a sticky to jump directly to the respective board.
Sticky notes are fully editable in Work Radar, and all changes are automatically synchronized in real time.
IntelliFrames
Jira IntelliFrame
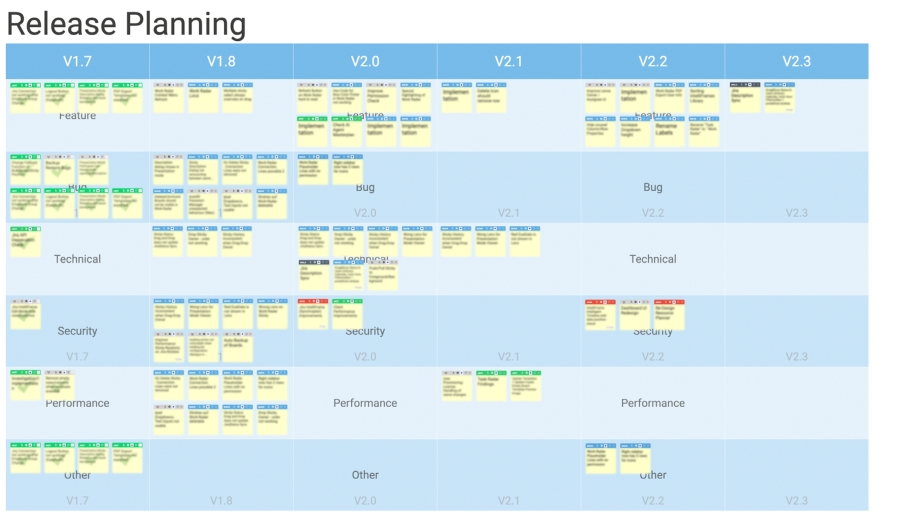
The Jira IntelliFrame transforms your Jira issues into a clear and well-structured visualization directly on your board. This allows you to instantly see relationships, priorities, and progress at a glance, turning complex issue lists into a visual planning workflow that actively supports your team.
Your Benefits
- Better overview: Visualize Jira issues in a clearly structured grid that immediately highlights relationships, priorities, and progress.
- Full flexibility: Choose any Jira fields for defining rows and columns, such as Responsible, Component, Status, Priority, or Issue Type.
- Focused insights: Use a JQL filter to display only the issues that are relevant to your current planning or review.
- HotSync: Seamless real-time synchronization between ALEAS Board and Jira.
- Efficient collaboration: Provide your team with a shared visual overview that simplifies discussions, makes dependencies visible, and supports forward-looking planning.
Create a Jira IntelliFrame
Before you begin, make sure Jira Sync is enabled for the board you are currently working on. (More information can be found in the Jira section of the Help Center.)
To create a new template, open the Jira IntelliFrame Editor in the IntelliFrame Library. There, you can enter a custom title as usual. In addition, several settings are available: you can hide the footer, make stickies read-only, or hide empty data fields.
Next, select a Jira project from the dropdown menu. The available projects are loaded directly from your connected Jira instance. Once a project is selected, you can define which Jira properties should be displayed as rows and columns. For example, you can structure your issues by status, priority, component, or issue type.
Optionally, you can add a JQL filter to narrow the focus further and display only the issues that are relevant to your current planning or review.
You can also customize the color scheme or change the sticky color if desired.
Click “Save” once you have completed all settings. After adding the Jira IntelliFrame to the board, all Jira issues will appear as sticky notes and will automatically be arranged according to the rows and columns you defined.
All changes you make on the board are synchronized directly with Jira — and vice versa. This ensures that your data always stays up to date in both systems.
IntelliFrames
iFrame Embed
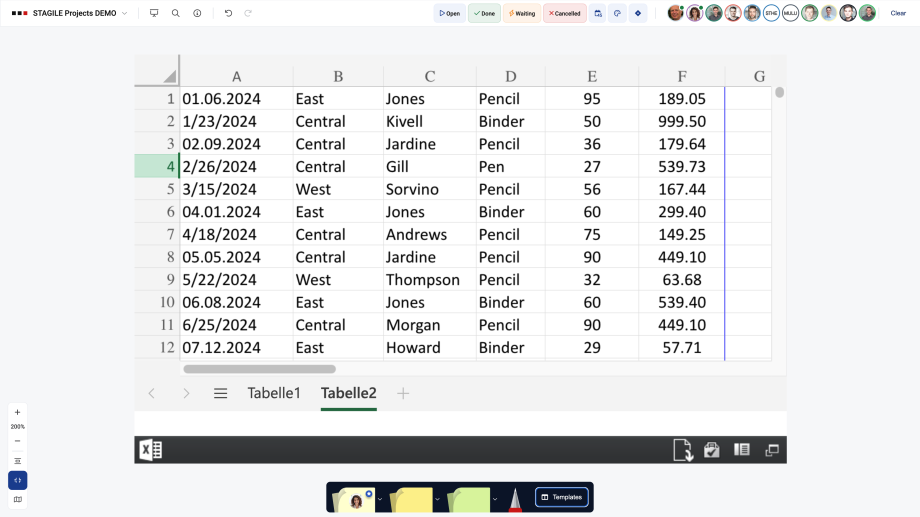
With the iFrame Embed IntelliFrame, you can embed websites or Microsoft files such as Word, PowerPoint, or Excel documents directly into your board, making external content easily accessible. Changes are displayed in real time. Please note that Excel, Word, and PowerPoint files can only be embedded using the online version or Microsoft 365 Web Apps. Depending on the application, you can find the embed link for Microsoft files under File → Share and then via the Embed option.
Example: Excel Embed
To embed an Excel spreadsheet, for example, open the file in Excel Online. Go to File, click Share, and select Embed this workbook. Then copy the provided iFrame link.
Next, open the iFrame Embed IntelliFrame in the IntelliFrame Library and click Add IntelliFrame. Paste the link into the input field, click Save, and position the embedded file on the board. If needed, you can resize it as usual.
The embedded file is interactive, so you can scroll through worksheets or switch between pages directly within the board.
IntelliFrames
PowerBI Connector
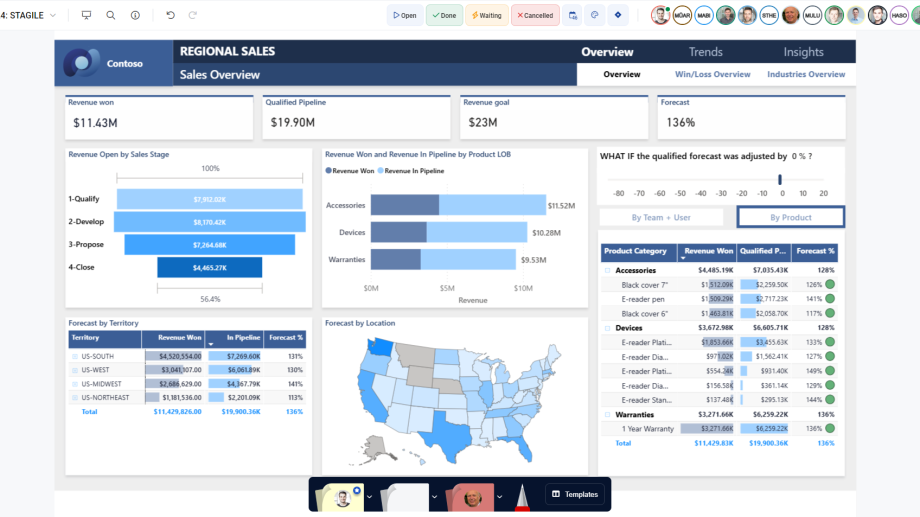
With the Power BI Connector, you can embed live previews of Power BI charts directly into your board. The charts update in real time, so you always have access to the latest data.
To embed a Power BI chart, open the Power BI IntelliFrame and click the Add button. Then select one of your workspaces from the menu and choose a report. You can then customize the template by enabling the command bar, filter pane, or navigation pane. Once everything is set, click Save and place the template on the board.
You can use the Power BI filter options directly on the board. To display the charts, you must be logged in to your Power BI account.
Please note: Depending on your organization, the Power BI integration may require approval from an admin or your company’s IT department.
IntelliFrames
Sticky Binding
“Sticky Binding” is a feature that makes your project planning more flexible and time-efficient. It ensures that all stickies placed on an IntelliFrame remain within their table cells and keep their position.
This means:
- When you reposition an IntelliFrame, the stickies automatically move with it.
- When you add a new row or column in the editor, or move existing rows or columns, the stickies remain anchored to their respective position within the table cell. Each sticky is assigned to the table cell in which its upper-right corner is located.
A red chevron in the upper-right corner of a sticky indicates that “Sticky Binding” is enabled for that IntelliFrame.
“Sticky Binding” is enabled by default. However, you can disable the feature at any time in the IntelliFrame Editor.
IntelliFrames
IntelliFrame Library
Our IntelliFrames are special templates which – as the name suggests – are equipped with special “intelligence”. All IntelliFrames can be found in a separate IntelliFrame Library in the Template toolbar, which we will be continously growing in the future.
There are currently the following IntelliFrames available in the IntelliFrame library:
- Sprint & Masterplan: IntelliFrame for agile project planning
- Spreadsheet: IntelliFrame for basic tables
- Agenda: IntelliFrame for meeting and workshop agendas
- Work Radar: Display sticky notes from multiple Sprint & Masterplan in a single, time-based overview
- Jira IntelliFrame: Organize Jira issues as sticky notes in a clear grid view
- iFrame Embed: IntelliFrame for embedding spreadsheets and websites
- Power BI: IntelliFrame for embedding Power BI charts
- ALEAS Projects: Can be activated for companies that use ALEAS Projects
IntelliFrames
Spreadsheet
The Spreadsheet IntelliFrame is a highly versatile tool that can be used for a wide range of use cases, such as Kanban boards, budget planning, project management, or other structured overviews.
IntelliFrames
Sprint & Masterplan
The Sprint & Masterplan IntelliFrame was developed based on the STAGILE® framework and is ideal for agile or hybrid project planning. It is a calendar-based template that gives team members clear time orientation and helps them quickly identify relevant stickies for Scrum meetings.
Create a Sprint & Masterplan
When opening the editor, you’ll see the available settings on the right, just like in the Spreadsheet. One important difference is the calendar-based structure.
At the top, you’ll find the settings for the sprint section. A sprint usually lasts four to six weeks. You can set the start and end date manually or hide the sprint section completely.
Below that, you’ll find the parameters for the master plan section. While each week is displayed as a column in the sprint section, each month is shown as a unit in the master plan. By default, calendar weeks are also displayed there, but you can disable them if needed. Please note: the master plan period is a fixed time range. This means that custom columns can only be added to the left or right, but not within the existing time period.
You can flexibly adjust the timeframe in both the sprint and master plan sections, add swimlanes or custom columns, and customize the color scheme. Details on editing rows and columns can be found in the Spreadsheet section. The header color is based on the selected color scheme, while the size and color of custom columns and all rows can be defined individually.
IntelliFrames
Agenda
With the Agenda IntelliFrame, you can quickly create structured agendas for meetings and workshops. Compared to traditional tools, a new agenda can be created in no time and adjusted flexibly.
Create an Agenda
In the Agenda IntelliFrame Editor, you can add a title as usual and enable or disable Sticky Binding if needed. You also have access to specific agenda settings: you can optionally add a date, define a timeframe with a start and end time, set the duration of time units between 5 and 60 minutes, specify the number of columns, and adjust the column width.
When you click on the header or footer, the editing menu opens. There, you can adjust the label or change the background color.
You can also select a color scheme and show or hide the header and footer.
Once all settings are complete, click Save and place the template on the board.
Time Display
A time display is automatically shown for each agenda. The time is based on your local time zone or your time zone settings. In addition, the remaining meeting time is displayed at the bottom of the template.
Shift Agenda
A special feature allows you to shift the time frame of your Agenda IntelliFrame with just a few clicks.
Activate the template mode and right-click on the agenda template, then select “Shift Agenda” in the context menu. A new window will open where you can change the time frame based on the current time increments. The start and end time will adapt automatically.
IntelliFrames
Work Radar
Work Radar is an IntelliFrame that brings together sticky notes from multiple Sprint & Master Plan templates in a clear, time-based view. This helps you identify overlaps faster, see priorities at a glance, and plan ahead. At the same time, you get a cross-board overview without having to switch back and forth between different boards.
Each selected Sprint & Master Plan IntelliFrame is displayed in its own row, keeping all content clearly separated and easy to understand. Stickies are automatically assigned to the correct calendar week based on their original position in the respective template. No manual adjustments in Work Radar are required.
Create a Work Radar
Open the IntelliFrame Library and select Work Radar. Enter a title, then define the time period you want to display. Next, select the boards you want to include and choose the Sprint & Master Plan IntelliFrames from those boards. You can select multiple boards and multiple IntelliFrames.
Then select one or more users. Work Radar displays all stickies where these users are assigned as Sticky Owner or Supporter.
Optionally, you can also adjust the color scheme. Once all settings are complete, click Save and place the Work Radar on your board.
Important Notes
For Work Radar to work correctly, Sticky Binding must be enabled for your Sprint & Master Plan templates.
The position of a sticky in Work Radar is based on its position in the original template. The upper-right corner of the sticky is used as the reference point for assigning it to a calendar week. If the right edge extends beyond a week boundary or separator line, the sticky will be shown in the following calendar week.
If a sticky appears in the wrong column, open the corresponding board with the Sprint & Master Plan and adjust its position there.
Working with Work Radar
Use the Refresh button to reload the Work Radar, for example after making changes to one of the linked boards. You can also edit the Work Radar at any time, for example to adjust the time period or change the selected boards.
Right-click a sticky to jump directly to the respective board.
Sticky notes are fully editable in Work Radar, and all changes are automatically synchronized in real time.
IntelliFrames
Jira IntelliFrame
The Jira IntelliFrame transforms your Jira issues into a clear and well-structured visualization directly on your board. This allows you to instantly see relationships, priorities, and progress at a glance, turning complex issue lists into a visual planning workflow that actively supports your team.
Your Benefits
- Better overview: Visualize Jira issues in a clearly structured grid that immediately highlights relationships, priorities, and progress.
- Full flexibility: Choose any Jira fields for defining rows and columns, such as Responsible, Component, Status, Priority, or Issue Type.
- Focused insights: Use a JQL filter to display only the issues that are relevant to your current planning or review.
- HotSync: Seamless real-time synchronization between ALEAS Board and Jira.
- Efficient collaboration: Provide your team with a shared visual overview that simplifies discussions, makes dependencies visible, and supports forward-looking planning.
Create a Jira IntelliFrame
Before you begin, make sure Jira Sync is enabled for the board you are currently working on. (More information can be found in the Jira section of the Help Center.)
To create a new template, open the Jira IntelliFrame Editor in the IntelliFrame Library. There, you can enter a custom title as usual. In addition, several settings are available: you can hide the footer, make stickies read-only, or hide empty data fields.
Next, select a Jira project from the dropdown menu. The available projects are loaded directly from your connected Jira instance. Once a project is selected, you can define which Jira properties should be displayed as rows and columns. For example, you can structure your issues by status, priority, component, or issue type.
Optionally, you can add a JQL filter to narrow the focus further and display only the issues that are relevant to your current planning or review.
You can also customize the color scheme or change the sticky color if desired.
Click “Save” once you have completed all settings. After adding the Jira IntelliFrame to the board, all Jira issues will appear as sticky notes and will automatically be arranged according to the rows and columns you defined.
All changes you make on the board are synchronized directly with Jira — and vice versa. This ensures that your data always stays up to date in both systems.
IntelliFrames
iFrame Embed
With the iFrame Embed IntelliFrame, you can embed websites or Microsoft files such as Word, PowerPoint, or Excel documents directly into your board, making external content easily accessible. Changes are displayed in real time. Please note that Excel, Word, and PowerPoint files can only be embedded using the online version or Microsoft 365 Web Apps. Depending on the application, you can find the embed link for Microsoft files under File → Share and then via the Embed option.
Example: Excel Embed
To embed an Excel spreadsheet, for example, open the file in Excel Online. Go to File, click Share, and select Embed this workbook. Then copy the provided iFrame link.
Next, open the iFrame Embed IntelliFrame in the IntelliFrame Library and click Add IntelliFrame. Paste the link into the input field, click Save, and position the embedded file on the board. If needed, you can resize it as usual.
The embedded file is interactive, so you can scroll through worksheets or switch between pages directly within the board.
IntelliFrames
PowerBI Connector
With the Power BI Connector, you can embed live previews of Power BI charts directly into your board. The charts update in real time, so you always have access to the latest data.
To embed a Power BI chart, open the Power BI IntelliFrame and click the Add button. Then select one of your workspaces from the menu and choose a report. You can then customize the template by enabling the command bar, filter pane, or navigation pane. Once everything is set, click Save and place the template on the board.
You can use the Power BI filter options directly on the board. To display the charts, you must be logged in to your Power BI account.
Please note: Depending on your organization, the Power BI integration may require approval from an admin or your company’s IT department.
IntelliFrames
Sticky Binding
“Sticky Binding” is a feature that makes your project planning more flexible and time-efficient. It ensures that all stickies placed on an IntelliFrame remain within their table cells and keep their position.
This means:
- When you reposition an IntelliFrame, the stickies automatically move with it.
- When you add a new row or column in the editor, or move existing rows or columns, the stickies remain anchored to their respective position within the table cell. Each sticky is assigned to the table cell in which its upper-right corner is located.
A red chevron in the upper-right corner of a sticky indicates that “Sticky Binding” is enabled for that IntelliFrame.
“Sticky Binding” is enabled by default. However, you can disable the feature at any time in the IntelliFrame Editor.